To begin configuring your courses, have GoTab enable coursing for your location.
Navigate to Location Settings > Full Service, then press +Add Course
- Course Name: Name your course (Appetizers, Entrees, Desserts, etc.)
- Average Time Eating (seconds): Establishes how long the expected consumption time is for guests once the items from this course are delivered
- Auto-timed: When turned ON, this will ensure that the course is fired after a calculated amount of time (Previous course hold time + prep time + eating time) - (Current course prep time). When turned OFF, staff will need to manually fire items configured to this course to the kitchen (unless the trigger on fulfill is turned on).
- Example: Desserts have this set to ON and are set to fire after Entrees. The Dessert rung has a 5 min prep time. Entrees are being held for 10 minutes, have a 15 min prep time and a 20-minute eating time. The Dessert will be held for (10+15+20) - (5) = 40 minutes.
- It is important that you have correct prep times configured for your items for this setting to work as intended.
- Trigger on fulfill: The course will be triggered to fire after the course ahead of it has been fulfilled.
- This will take into account the eating time of the prior course and the prep time of items in the current course.
- Note: If both Auto-Timed and Trigger On Fulfill are set to ON, the shorter time will be respected
Once your settings are configured to your liking, press save.
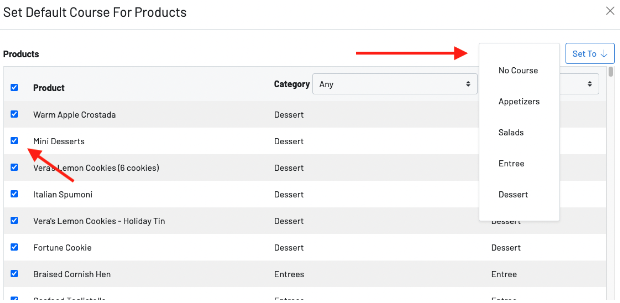
To assign products to a default course, press the “manage products” option at the top of the pageFrom here, you can search for a specific category or course.
- Category: View all products within a category and select which items should be included in a course.
- Choose “Set To” and select which course the selected products should be configured to.
- Course: View all items configured to a specific course
- Choose “Set To” and select which course the selected products should be configured to.
- You can also filter both for category and course at the same time.
- When selecting products and choosing a course under “Set To” the products will automatically save to the course you select.
Note: Setting default courses is optional and generally recommended for restaurants whose clientele expect their meals to be coursed. Products can always be manually assigned on a case-by-case basis via the POS or at checkout in the guest flow.
Fulfillment:
- Printed and KDS tickets default to print each course individually when they are fired
- KDS Tickets can be set to view “Held” orders as well, displaying any courses not yet fired. These tickets will display in light purple with a countdown time before which their status will go from “Held” to “Fired.” This can be turned on for any individual KDS display:
-
- KDS Settings
- Toggle ON “Show Held Orders”
-
- For locations using Station Grouping: You can optionally set printing to print the entire table’s order, with each course broken out. If opted into this setting, there will be a “Fire” ticket that prints to indicate when each course should begin to be worked on.
Click here to learn how to use POS Coursing.
Click here to learn how to use Guest Coursing